Tag Archives: Management

Going Medieval Review (Early Access)

If you’ve logged thousands of hours into RimWorld and Banished, Going Medieval is the perfect new game for you to try. It is an extremely promising new colony sim that just entered into Early Access – boasting a list of features reminiscent of RimWorld when it first came out. Yes, it is still very new and barebones, but the framework has the potential to become another behemoth in this genre.

This review will go over what the game does well and which areas it needs to improve prior to release. Overall, it is still a strong recommend if you enjoyed other colony sims.

Going Medieval is on sale for 25% off full price at Green Man Gaming until June 11th! If you are interested in starting the game, check out our Going Medieval Essential Tips!

Pro: 3D Building is Amazing

Having played other colony sims, the ability to create buildings in 3D is a great change in pace. There are a few kinks to be worked out, but the overall feeling even in Early Access is still fantastic.

Going Medieval is the game to play if you ever wanted to design your own functional village, build a castle from the ground up, and throw up walls/traps to protect your people. It even gives you the option to build a basement or underground rooms if you so wish – some players have actually opted to building their entire base underground!

As the game becomes more developed and more items/buildings are added, your customization will definitely improve. The devs will also hopefully add modding support at some point in game development and that will open the game up similar to how RimWorld has tons of new content in the workshop.

Con: Building System is Hard for Beginners

The system can be a little confusing when you first start out. The tutorial tips give you a brief overview of how to build and orientate yourself to the different levels, but actually constructing a building you the way you want will take time.

One aspect I struggled with in particular was accidentally placing walls/items on the wrong floor and accidentally cancelling/deleting the wrong part of the building when I was trying to fix the mistake. This alongside a slightly unclear camera POV makes the early building process lackluster. Once you get more practice, you should have no problems designing structures to your content – but occasionally something will screw up and leave you feeling dissatisfied.

Pro: Easy to Understand Research System

Very straightforward system of creating different types of books as currency and spending it on your research of choice. Although some people might not like this linear progression system, it makes sense to me from a freedom standpoint. Unlike other games where you are locked into a specific research topic, the system in Going Medieval will allow you to choose what you want to research as long as you have the books for it. This gives you more flexibility to build up resources and spend it once you identify what you need next.

It is also cool to see that even though you “spend” your books, they still exist as physical items that you have to store. It gets annoying though once you progress through the game and end up with stacks and stacks of books with no ability to store them on bookshelves.

Con: Poor Work Prioritization AI

The work prioritization system in Going Medieval is virtually an exact copy of games like RimWorld and Amazing Cultivation Simulator. Unfortunately, it does not quite work as well as you may think. For example, even if you prioritize your “doctor” to healing, your other villagers might still die from their wounds since they were not tended. Likewise, prioritizing cooking does not seem to really prioritize them to cooking. There were multiple instances where the cook would start chopping trees even though the cooking task was not finished and there were more than enough raw supplies available.

Forcing prioritization of tasks is also very micromanagement intensive. You have to select a villager and right click to manually force them to do a task. Having a more robust AI system and an easier method of forcing tasks will be crucial to providing players with a smooth gaming experience.

Pro: Excellent Raid Concept

I’ve encountered three types of raids so far: random raids, raids after you accept a new member, and attacks from wolves. The simple backstory behind why a raid occurs is an excellent system for storytelling purposes and I am excited to see what new scenarios will come in the future.

On the roadmap they describe diplomacy and a vassal system with other villages in the region. Raids backed by these systems will really improve that sense of immersion where you can roleplay as a medieval Lord fighting for land and glory.

Amazing Cultivation Simulator also has a similar faction and raid system where enemy factions will periodically send their disciples to invade your home. You can engage in some basic diplomacy, but most players just choose to fight the battles since it is a fun way to play the game.

Con: Cannot Move Furniture

Really big pet peeve of mine is not being able to adjust furniture in rooms. I like to design a very basic structure when starting the game, but moving everything around once I have a more permanent structure built. Going Medieval does NOT have any way to move furniture, meaning you either have to design your buildings very well right away, or you have to deconstruct and rebuild items where you want them.

Keep in mind that each time you deconstruct furniture you also lose part of the materials. For wood furniture it is no big deal, but rebuilding a kitchen early on can be problematic since iron ingots may be hard to come by.

Pro: Great Colony Sim for Beginners

Although building may be difficult for absolute beginners, overall the game is extremely forgiving. It is actually fairly difficult for your village to get wiped out – food is relatively easy to come by as long as you researched preserved food, and raids are low risk as long as you have 1 archer.

Many of the game concepts are also easy to get the hang of within an hour of starting such as planting crops, building roofing, setting storage areas, and setting up breweries/smokehouses.

Con/Neutral: Limited Combat

Lots of opportunities for the devs to expand on combat in the future, but at the moment it boils down to putting archers on roofs/hills and sending melee fighters to guard the stairs leading to the archers. Once archers start firing, you just have to manually select targets for your melee fighters to ensure that no one reaches your ranged troops.

Unfortunately, there is no “hold ground” command and you end up with a zerg rush towards the enemy the moment they are in range. I usually end up with injuries on the archers due to this whenever I get lazy and don’t manually set targets.

There is a lot of promise, however, since the siege concept shown in trailers could open up so many opportunities for squad-based combat. I have this down as a con currently but will realistically be a pro in the future after some development.

Neutral: Lack of End Game Content

As a brand new Early Access game I have little expectation for having a fully fleshed endgame. However, before buying you should be aware that the vast majority of intended features are not yet implemented. Take a look at the roadmap and see if you like what you see.

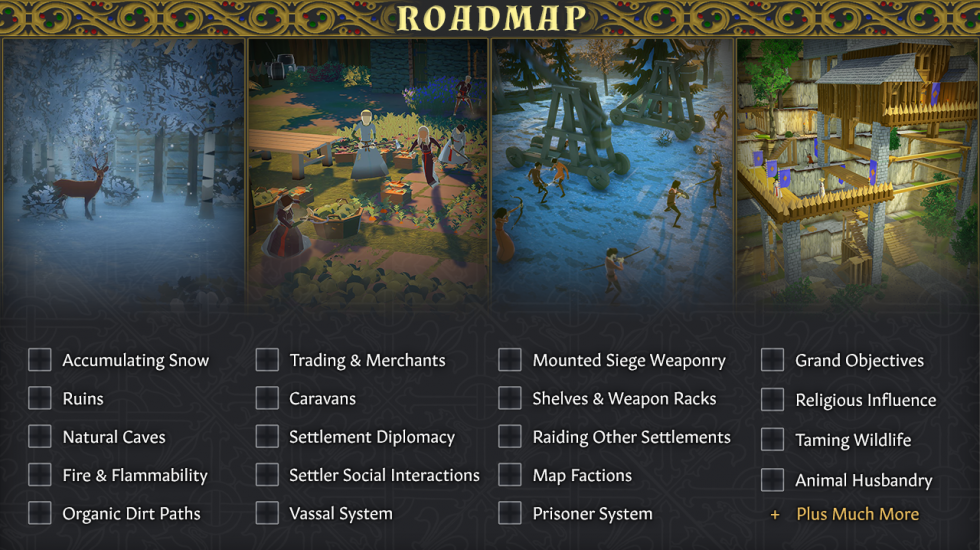
I personally already really enjoy this game, and the roadmap is extremely promising to me. It is not a guaranteed hit, and people should be careful for sure, but I am willing to take the risk based on what I can see so far.

Final Thoughts

Overall verdict for Going Medieval is a buy even in its Early Access form as long as you can overlook some of the bad quality of life aspects. It is definitely an enjoyable game despite not having all of its features quite fleshed out yet. Many of the planned future developments are also exciting to see since it seems to take a different direction than other colony sims.

Going Medieval is on sale for 25% off full price at Green Man Gaming until June 11th! If you are interested in starting the game, check out our Going Medieval Essential Tips!

Follow us on Twitter and Facebook for updates on our guides and reviews.

Project Hospital Guide and Beginner Tips 2020

Project Hospital is a medical management simulator that gives you the power to design your very own hospital and challenges you to overcome day-to-day obstacles. This guide will go over the starting tips for getting started!

See more game information on Steam here.

1. Build extra Emergency Department Doctor’s Offices

The requirements to start an Emergency Department is very low at just one doctor – but the progress rate from this one office is excruciatingly slow. Build at least 3-4 extra offices to increase capacity for more patients. It is virtually impossible to lose money investing in these offices and so definitely feel free to increase the capacity.

One thing to consider is the number of patients being sent to you currently. Take a look into the investor tab and see the number of patients you have currently – these will increase as you see more patients each day. Increase the number of doctors as needed whenever you see that you have a lot of people waiting in your waiting room throughout the day.

Finally, placing a few intern-level doctors in these offices will also be an easy way to make money since they are fully capable of handling low-difficulty cases.

2. Leave room between clinics for expansion

When more patients show up to your hospital you will end up needing to increase the capacity for each of your clinics. Placing them immediately side-by-side will only result in restricting or fracturing of your clinics.

As soon as you have a basic Emergency Department built, start planning out the rest of your hospital including advanced clinics, ICU, trauma, and staff facilities. Having this blueprint to go by allows you to expand your clinics later on.

General rule of thumb is that the emergency department, radiology, and medical labs will all need a lot of extra development later on due to the role they play in basic patient diagnosis. Radiology development specifically will be crucial due to how many patients need the advanced diagnostic capabilities.

3. Use Pre-Fabricated Rooms to start

These rooms are a great way to get started with the game. It essentially provides you with a modular way to build your hospital without needing to micro-manage the nitpicky details of which rooms require what equipment. Pre-fabricated rooms have everything your doctors and nurses need to diagnose and treat patients along with having a relatively decent aesthetic.

As you become more familiar with the game, you may want to start creating your own pre-fabs or even creating each room from scratch since that is the only way to really make the most out of the space you have. The only downside to this is that you have to really enjoy building things in tiny pieces.

Another benefit to pre-fabricated rooms is that it makes creating blueprints and designing your entire hospital much, much easier. All you have to do is plop down a few rooms/offices, take a look at the number of personnel you will have room for, and then you can have a decent gauge of how much space you need.

4. Build the bare minimum for Radiology and Medical Laboratories first

These departments can be extremely expensive to invest in right at the beginning of the game. Start off with building the basic machines only and invest in more machines later on once you get more notifications that patients are not being diagnosed properly.

As mentioned above regarding space, Radiology and Medical Laboratories are two of the busiest sections in the hospital due to the number of patients that need things like MRI or X-Rays. Make sure to leave lots of room in this area of the hospital for further expansion.

One final note is that these departments should be relatively central to the hospital and near elevators for quick access. These are some of the highest traffic areas and your hospital will benefit from the improved time efficiency.

5. Money comes from treatments, not examinations

Keep this in mind when you set your controls for how sure the doctors have to be of their diagnosis before beginning treatment. In some cases it may cost you a lot more money to get to 100% certainty diagnosis, but in some other cases a misdiagnosis will cause problems with patient satisfaction and hospital prestige.

The key is to hover over the symptoms the patient is experiencing and select the examination that overlaps amongst as many of the symptoms as possible. This ensures that your can make your diagnosis in as few examinations as possible. Depending on your settings, you can also hover over the different possible diagnosis and conduct examinations based on what the differential might be.

Also keep in mind that each doctor has their own ability to diagnose – hiring doctors with better skill will make things more efficient for you. These skills can also be trained once you have built your study room, see #10 for more information.

6. Focus on Insurance Contracts

Insurance contracts are the main method of receiving patients and focusing on their goals will increase how many patients you can receive each day. Focusing on this area will also be a good way for you to learn the game since they tend to advance in a fairly logical method.

Compared to non-insured patients, the insured patients will usually have a higher % boost to how much they pay the hospital – allowing you to expand more services. Developing your hospital in accordance to the contracts early on will help you establish a strong foundation for future progress.

7. Avoid hiring staff with negative perks

Things like having dirty footsteps or having increased needs can make your hospital very inefficient if you do not pay attention to your employees. Avoiding these individuals in the first place will make your life a lot easier compared to having to build new janitorial stations or offices to compensate for staff not working.

That being said, some staff members will also have a positive perk as well (ex. being better at diagnosis) that may offset this negative and so you do have to use your judgement. Ensure that any employee you hire with a negative trait has at least 1 positive trait along with great skill values to justify the hire.

8. Manual Diagnosis and Treatment improves accuracy and efficiency

Selecting manual diagnosis and treatment will place you directly in control of how your doctor examines and treats your patient. As mentioned above, spend time learning the different symptoms and which examination helps clarify the disease state. Moving your mouse over the explanations will help with minimizing resource wastage – especially with things like MRI and X-ray that may be needed by other doctors.

The faster you get to the final diagnosis (with fewest steps taken), the faster you get paid for treatments. Keep in mind that you will also be able to provide treatments for CURRENTLY experienced symptoms as well – meaning that if someone is in pain, you can immediately prescribe them analgesics without having to have the final diagnosis.

The danger with automatic diagnosis is that some unskilled interns may make mistakes and end up misdiagnosing/mistreating the patients. This usually results in patients returning to the hospital with worsening symptoms along with a hit to your hospital prestige. Be very careful when manually diagnosing since poor results can affect the entire hospital.

9. Pay attention to Skill percentage

A doctor’s skill with diagnosing and treating patients plays a huge role in how efficient they are at helping patients. Hiring doctors with great skills is usually more expensive, but definitely worth it for the efficiency and improved hospital prestige.

Most significant of the skills is the ability to diagnose – if the doctor has the ability to do a differential diagnosis then it can drastically reduce chances of a 50-50 situation. Essentially every skill matters in Project Hospital – including those of support staff such as Janitors. Hiring the correct healthcare providers plays a large role in improving prestige, patient satisfaction, and ultimately profit.

One final note is that you should constantly be sending a few of your doctors to study at a time. Over the course of a few days in-game time the improvements in skill will be drastic. See #10 for more information.

10. Build a study room after your first clinic

Usually once you have built your first specialized clinic your hospital will more or less be capable to sustaining several doctors at a time. This is usually a good time to build your study room for improving doctor skill.

One tactic I like to use is to build 1-2 small offices in the Emergency Department and hire fresh interns that are as young as possible. You want these doctors to be trained as your absolute best and hiring them while young ensures that you have lots of time to use them before they retire. As soon as they are hired, bookmark them and constantly send them to study in their basic diagnosis and general medicine skill levels. Over time these will be at a suitable skill for improving their experience very fast.

Even for other more experienced doctors the study room has its benefits. Often times you may have a great diagnostician, but someone who is also an average surgeon. Sending these individuals to develop their skill in surgery will be very beneficial to crafting the perfect team of physicians.

11. Hire a night shift right away

At the start of the game you typically won’t have anything more than the Emergency Department and maybe one specialty clinic. These are very easy to make money off of and setting up a night shift right away gives your doctors the ability to continue helping patients that show up.

Only having the bare minimum for the night shift is usually enough since traffic for the clinics dies down substantially. Once you have unlocked and built wards for hospitalized patients, then make sure you have sufficient nurses in the night shift to prevent complications from arising.

The most important department to have night shift for is Radiology and Medical Laboratories. These departments play a huge role in fast diagnosis and treatment – investing in extra technicians during the night is absolutely worth it.

12. Invest in more beds

Beds are filled up very quickly in Project Hospital. It is extremely important for you to build extra wards and rooms for hospitalized patients since procedures are one of the best methods for making a profit. The result of not having enough beds is that the patients are immediately transferred to another hospital once the doctor determines that hospitalization is required.

This also refers back to #2 where you want to leave lots of room for more beds in each of the clinics that you want to take hospitalized patients for. Having enough room for at least triple your initial number of patients is a good rule of thumb if you intend to continue building your hospital until late game.

Bonus Tip: Create your own Doctor!

Creating your own Doctor allows you to set age, customize appearance, and give 2 positive traits – all for the cost of $10,000. As soon as you create your doctor, you will also obtain access to a great insurance contract that gives you a percentage boost in profits. This absolutely justifies the $10,000 price tag since you will inevitably make it back with your new doctor.

I personally really enjoyed this part of the game since it gives you a bit of role-play potential if you select the doctor as player-controlled. You can end up diagnosing patients very efficiently and very quickly using this new doctor and help them improve their skills fast.

Conclusion

Project Hospital is one of the best medical management games out on the market – and by far the most realistic one. Getting started can be difficult even after finishing the tutorials and I hope that this guide and list of tips has helped you on your journey! 🙂

Follow us on Twitter and Facebook for updates on our guides and reviews

The Rule of Land Pioneers Beginner Guide and Tips

The Rule of Land: Pioneers is a new survival management game released on Steam. It is a side-scrolling game that emphasizes management over action, but still has elements of hunting and fighting. The game ultimately revolves around balancing your character’s needs (water, energy, mental, temperature) and ensuring that you have enough supplies to survive longer than your opponents.

This beginner guide will go over tips on how to manage the early game and improve your ability to survive. Keep in mind that the game is still in early access and will constantly be updated and balanced.

1. Always cook food

The bonfire is extremely easy to craft early on and there is no reason you should risk dysentery or food poisoning from eating raw food. All you have to do is provide fuel (usually wood) and an animal/vegetable you have collected. It is usually best to leave it there to cook and go out for more supplies to maximize your time efficiency.

2. Construct a Rainwater Catcher ASAP

Water can be hard to come by depending on your starting area. If you do not have ready access, building a Rainwater Catcher is a priority early on. You not only need it for hydrating your character directly, you will also need water to create stews and medications.

Keep in mind that you do not automatically receive water each day – you actually have to wait for it to rain. This means that an early set-up will improve your ability to generate water and avoid any situations where your character may die of dehydration.

3. Start in the City

The city is a fairly balanced start and the number of cars everywhere enables easy access to important materials. You can obtain anything from preserved food to even intact hides. It is a great place to start when first starting the game. Later on you may need materials from other areas, but that equipment is not necessary until later in the game.

The City is also a great place to be since it is fairly central in the map. You will have access to multiple other areas and sneaking in at night is easier due to the close distance.

4. Manually bring the Crowbar from the “Other” tab

Make sure you actually bring it with you to use on cars. Like mentioned above, if you start in the City you will benefit greatly from the crowbar and the access to cars it brings. The game can give you one at the start of the game so make sure you take advantage of it.

5. Don’t have to return to camp every night

There is no need for you to return to camp every night. It is more time efficient to completely fill your inventory prior to returning to minimize time wasted on travelling.

The time circle is not representative of the hours in the day. When it completely fills, it is dawn of the new day. Also use this to track how much time you have to poach from your opponents’ territory.

6. Use Anesthesia bullets for Intact Hide

Regular bullets will cause damage to the animal and give you broken hide instead. Bring anesthesia bullets to bring down the large animals to obtain this crucial material. You will also rarely need more than one bullet for each large animal assuming you manage to hit them. Use the sneak function and slowly make your way closer to the animal before shooting to improve your aim.

7. Build the better shelter and save Intact Hide to make it first

It is much easier to just create the better shelter as your first sleeping place. The benefits are definitely worth the extra few materials you need to construct the tent. Intact Hide can also be used for other important buildings and upgrades, however you definitely need a shelter earlier on.

Without a shelter your character has no option to sleep and recover mental. Constructing a shelter should be one of your top priorities as soon as you start the game to prevent any issues later on.

8. Pause the game using ESC

Going into your bag does not pause the game, and neither do many other actions. The only definitive way to pause the game is to hit ESC. Keep this in mind since the game is very time-dependent and you really want to maximize your efficiency early on.

9. Improve bag space to at least 45

Even just a few extra spaces can greatly improve how much material you can bring with you when you go for gathering runs. After crafting your shelter, priority for Intact Hides goes to increasing bag space.

This will also be relevant when you begin making poaching runs into opponent territory and having a bigger bag space enables you to steal more. Taking opponent animals away is one of the best methods to beat them and larger bag space means you can take more before returning.

10. Improve relationship with Trader

Improving your relationship with the trader enables you to request for specific resource types when they come in next time. This can be very valuable since your starting location may not always have the resources you need. It will also be useful in case you want to focus on certain resource types and obtaining the rest from the trader.

From what I have seen so far, the only way to improve the relationship consistently is to always accept the offer to trade even when you do not need to. Always accept the trade and the relationship will increase over time. It will take quite a few runs to get the level needed to request for specific types of materials, but it will be worth it.

Conclusion

The Rule of Land: Pioneers is a very promising survival management game and definitely worth the pickup. Even as an early access title, it already offers several hours worth of entertainment.

I hope that these tips have been useful and any questions or comments are welcome!

Follow me on Twitter and Facebook to stay up to date with my future guides and reviews.

Software Inc Top 10 Tips for Beginners

Software Inc is a business management simulation game that revolves around the idea of building a successful software corporation. It is a fantastic tycoon game that incorporates many features that bring out the best of the genre. There are constant updates continuously coming out that add further depth to the game, and this set of tips is meant to help beginners get started.

Tip #1: Start on Easy with NO LOANS

It is natural as gamers to immediately want to jump to medium or above difficulty settings, but do that in this game and you will most likely start with a terrible impression. Starting on easy does two major things that I am aware of: it gives your starting character higher starting stats and makes cash flow faster into your bank. Additionally, starting with no loans gives you much more time to get your first product out since your starting guy does not have a salary. This sets the game up to be a little bit more forgiving for your first playthrough.

Tip #2: Increase your starting Programmer and Designer skills

Adjust the beginning slider so that designing and programming is at a higher ratio than the other few options. When beginning the game, it is recommended to start off with a smaller product suitable for a one-man team. Having a solid designing and programming skill helps you get the product out faster and increases the overall quality of your work.

Leadership, Marketing, and Artist are all very important, but at the beginning, it is all about survival. These other skills can be easily developed later on and can be complemented by staff you hire while you’re still learning. Let’s break down why:

Leadership:

  • Not too much to say here, this really only comes into play when you have a team and your character is designated as the leader. Team leads essentially just have meetings with their group and that increases everyone’s efficiency. Later on when you have the opportunity to get leaders trained with the HR Function, leaders become more important in automating the simple human resource tasks for you. As for the beginning, don’t worry about it too much.

Marketing:

  • Some people might argue that having a high marketing stat to begin with would benefit your first product, but I disagree. The amount of quality you lose by adjusting this to a higher value is not providing you with a better start at all. Marketing takes money to do well and that is capital you do not have at the beginning. Focus on this for later on products when it isn’t a do or die situation.

Artist:

  • Depending on your product, you may actually need to adjust this one as well. However, if you decide to go with the simple products that do not use graphical interfaces, programming and designing are the core. If you decide to go ham on your first product and add in all the graphical designs, then increase this stat to just below the designer and programmer stat.

Tip #3: Set your specialization to 2D or Audio

There are many, many possible products you can choose to get started with, but I have found through dozens of playthroughs and testing that choosing the 2D Editor or Audio Tool to begin with makes it a lot easier to progress in the game.

There are three major reasons for this:

  • These two products require the least diverse specialization at the start of the game (only need the 2D or Audio specialization to effectively make either product)
  • It is usually easier to create a higher quality product with just one person
  • Marketing is not necessary to ensure this first product succeeds
  • These three reasons are essentially linked in the sense that a one-man team will not have the proper specializations at the start of the game to cover complicated products like Operating Systems, and this resulting lower quality product is not going to *succeed without excessive marketing. These issues are resolved by starting with the 2D Editor and Audio Tool options.

Tip #4: Ride Solo

At the start you really do not have enough capital to spend on another programmer or developer. Hiring more employees would essentially bankrupt you before you get halfway through the Alpha stage. Your starting developer (if starting on Easy) should have the capabilities to finish a Good or even Great quality product on their own provided they are given enough time.

This is where the significance of this tip comes in:

With no additional staff, your only cost would be your rent and your utilities. This should be around $700 at the beginning, which should last you for much longer than you need to develop a simple 2D Editor or Audio Tool. As compared to the ~$2000 for just one more additional rookie developer, going solo is a no-brainer.

Tip #5: Expand SLOWLY

Regardless of how your first product sale goes, it is a good idea to get into the habit of expanding slowly. I’ve had so many games end prematurely because I expanded fast right after a decent first sale, and ended up making much less on subsequent products. Look into what product that you would like to “main” and hire programmers/designers/artists with those specialties.

On Easy, it isn’t too hard to maintain a good cash flow, but higher difficulties make it hard to sustain higher salaries effectively. Get into the good practice of tightly controlling all your expenses including servers, staff, heating, rent, and salaries.

Tip #6: Get a dedicated Marketing Team

Managing multiple production lines can get confusing late game, and having a dedicated Marketing team to refer all marketing tasks to makes it easier. You can start with just 1-2 marketers at the beginning attached to your core team, but once you want to get your brand name out there, you should set the team up on its own. Usually, a team of 1 Lead and 9-10 Marketers is enough for you to get your marketing to Prominent pretty easily.

Additionally, the Marketing team can also be given marketing contracts to fulfill – essentially paying for themselves. There will be a daily marketing amount that your team has to fulfill, but I have found that as long as you fulfill around 70% of it your client will remain happy. One consideration for this is that you could be marketing for a competitor’s product and that may affect your own sales, but realistically if your product is good enough this won’t matter too much. You could just take contracts for other types of products as well if you are worried.

Tip #7: Utilize the Project function

Once you have a decent cash cushion, it may be beneficial for you to set up an additional team that is managed through the automatic Project function. In my previous post, I went over how the project management function in this game can essentially set you up for passive income. It is especially useful if you set up your project for something straightforward and with little variance like 2D Editors or Audio Tools. This lets you hire exclusively for the product and the end result is a higher quality sale.

Going back to the previous point, having a dedicated Marketing team also means you can set up multiple projects and have all of their marketing needs met by a single team. I have played numerous games where the marketing level for my Audio Tools and 2D Editors reached Widespread with little effort on my part.

Tip #8: Start your own Server

Gotta love passive income. Hosting contracts can be a very lucrative way to sustain your operations and entering into distribution deals with other companies can give you a hefty sum each month. Additionally, you would end up paying someone else to host your games if you decide to not do it yourself.

1. Buy 3-4 servers and link them. (Can do this by right-clicking one server, selecting “select all in room”, then select the “link” function) 2. Hire a receptionist and set up the reception (this lets contracts show up on the “Contracts” tab) 3. Accept any Hosting deals above ~0.35/mb to maximize profits. 4. Go to the “Distribution” tab and click “Open Online Distribution Platform” 5. Go to the companies tab and find one with a decent number of fans and medium company worth. (Do not go for the higher end companies yet!!) 6. Offer to sell their products on your online distribution platform. Note: Not going for the larger companies right now is a good idea because they tend to give you a smaller cut and your servers may not be able to sustain their usage. However, it is a good idea to get started as soon as you can since you can re-negotiate your cut each month. Having a longer relationship gives you a better chance to ask for a larger cut. Becoming the sole online distributor also allows you to constantly negotiate for larger and larger cuts as well.

Tip #9: Train new Programmers in a Support Team

A great way to get a solid, well-trained team of programmers is to first set them up as a Support team. What you need to do is hire a bunch of low salary programmers and a lead that have “Amazing” or “Great” compatibility or higher. Next, assign them all of the support tasks for all of your products and see if they can cope with the workload. If you can, then you can get another amazing source of passive income. Get those contracts and start seeing this team pay for itself!!

Over time you will see your support team gain specialization based off of the products they are supporting as well as an increase in their overall programming skill. When you are developing a new product, you can assign them to the programming phase to help increase quality. It just comes down to how much work they have and if they are able to keep up with their support workload.

Tip #10: Send people to training

Training your idle employees!! It may be a little micro-managing, but it certainly helps to cover all of your specializations over time. Another option is to first train all of your Leads with the “HR” skill so that they can do it for you. One option I found that worked well was setting the number of employees gone at once to 2, then setting the number of months to 3, and then setting the time delay to 0. When you have a full team, this setting lets you have enough members to get the product moving while still having some people gone for training.

If your style of play is just one team that covers all specializations, you may want to consider upping the number of employees to around 3-4 employees at once and moving the number of months up to 6. This will considerably slow down product development, but it will give you a better-trained team faster. This method is usually for late game when you have a cash cushion.

Conclusion

Software Inc is an absolutely fantastic game once you really get into it. Use these tips as a way to get started and figure out your own way to enjoy this masterpiece. Keep in mind that this game is still in Alpha though, there will be updates that change the way this game should be played.

Follow us on Twitter and Facebook to stay up to date with our guides and reviews!

Crusader Kings 3 Beginner Tips

Crusader Kings 3 (CK3) is a medieval strategy and management game that places you in charge of guiding an entire dynasty through hundreds of years. It is the long-awaited sequel to Crusader Kings 2, and it does not disappoint.

Any new players interested in starting with Crusader Kings 3 will likely meet a fairly sharp learning curve initially. Even if you have played Crusader Kings 2, there are still quite a few subtle differences that can stump you in your first few rounds. This list of beginner tips will hopefully help with getting you started in Crusader Kings 3!

See our Piety and Prestige Guide here, our Succession and Inheritance Tips here, and our Top 10 Tips for Starting as a Count here.

1. Fabricate Claims using the Bishop (or other religious leader)

This is one of the biggest changes since Crusader Kings 2. Instead of the Chancellor, it is now the religious leader that is used to fabricate claims. Another change is that it is no longer a randomized chance that rolls every year – there is simply a progress bar that fills up for the claim to occur.

The speed of progress and whether or not you receive a duchy claim instead of county claim is dependent on the skill of the bishop. Typically it can take around 1-2 years for the county claim to go through and it costs around 70-100 gold to claim. Please also keep in mind that you cannot be negative in gold to start a war so have some saved up in advance.

2. Learn the basic hotkeys

There is a LOT of clicking that goes into Crusader Kings 3. It is definitely worth learning the basic hot keys for bringing up menus if you plan to play for any longer than a couple of hours. Here are the simple ones that I like to use:

  • F1: Character Screen
  • F2: Realm
  • F3: Military
  • F4: Council
  • F5: Court
  • F6: Intrigue
  • F7: Factions
  • F8: Decisions
  • 1-5: Game speed (5 is extremely fast, be warned)
  • Space: Pause and Play
  • E: Regular Realm map toggle
  • T: Cultural Map
  • R: Religious Map
  • U, I, O: Duchy, Kingdomg, Empire Titles (shows them regardless of whether or not they’re formed)
  • W, A, S, D: Map Movement
  • B: Go back to previous menu

There may be other hotkeys people use, but these are the ones I’ve run into so far that I consistently use all the time. The escape key is just the usual button for exiting out of tabs. However, if you are trying to get rid of only the “Issues” menu then hit Tab instead since the Escape key will exit out of everything else first.

3. Increase County Control using your Marshall as soon as possible

Control makes a huge difference in how much levy and taxes you receive from a county. Anything below 50 Control will be a huge hit to what you can receive. It is usually worth sending your Marshall in to return Control back to 100 as soon as you are out of a war. This is actually one of the mechanisms that Paradox included to prevent snowballing since it’ll increase how long it takes for you to reap the benefits of new counties.

One caveat to this is if you are expecting someone to initiate another war with you in a short period of time or if you have a really great claim on someone who is momentarily weak. In this case, keep your Marshall on the “Organize Levies” tab for the extra Levy Size and Reinforcement Rate. However, during peace time increasing Control is much more important than increasing levies or improving commanders.

4. Christian Rulers can ask the Pope for Gold – use this ability early game

You can easily get anywhere between 125 to 200 or so gold as a Christian ruler in exchange for 250 Piety and a temporary decrease in relationship with the Pope. To qualify, it is best to have a good opinion score, some virtue traits, and as few sins as possible. There generally isn’t a good reason to not take the gold especially in the early stages of the game.

If you start off as a Duke or King, gold problems will likely still be at the front of your mind. Piety is a resource that does play a big role in being able to wage Holy Wars, but gold can usually take you a lot further. You need gold to pay for starting up your Men-at-Arms Regiments and to hire Knights with high Prowess. Without this fighting ability, it is hard to wage wars in the first place. Take the gold and think about Piety later.

Once you hit the part of the game where you are interested in reforming religions or embarking on Holy Wars, check out our Prestige and Piety guide here for how to obtain Piety.

5. Hover over information for a few seconds before moving to the tooltip

Once you wait around 3 seconds or so, the information bubble changes borders and sticks around for you to move your mouse onto it. For example, if I want to check my Monthly Income breakdown, I would hover over the tab so that the information bubble pops up, wait for around 3 seconds for the border to change, then move my mouse onto the bubble itself. Hopefully this helps with preventing any mild annoyances about getting the information bubble to stick around.

Alternatively, you can go into the “Game” section of the settings and change the Tooltips to Action lock or Mouse Tendency. This will give you a bit more freedom in choosing what you prefer. I personally stuck with the original method since I hate having to click again and again for the tooltips.

6. Forbid Sons with low Prowess from being Knights

Found this out the hard way when 3/4 of my sons died in the same battle. If they don’t have high prowess then they are much, much more likely to be killed in battle. Keep in mind that Martial and Prowess are two completely different values that represent different things. Martial is the main value you usually see that represents their ability to command troops – it is also the value you use to select for a good Marshall. Prowess is the ability to actually fight, you can see a person’s prowess when you look to the right of the main stats and see the hand grasping a sword.

To forbid a person from being a knight, hit “F3” to bring up the Military Menu, click on the Knights menu, scroll to your sons and select “Forbid”. In some cases, you might even want to keep your heir safe and forbid them even if they have a high prowess score. Things can randomly happen in battle and sometimes avoiding the risk altogether can be better for your dynasty.

One other thing to keep in mind is that some characters have the “Brave” trait. This trait increases the character’s chance of dying in battle by 100% while offering a few bonuses to combat ability. It is great that some characters are monsters and can carry a fight, but don’t let that character be your only heir (unless that is what you are role-playing). Keep an eye out for this trait specifically just in case!

7. You can increase Men-at-Arms regiment sizes directly

Simply click on the regiment portrait to bring up the menu and hit “Increase Size to ____”. This gives you more variety in which Men-at-Arms types you want to bring into battle with you. The overall cost would still be the same since the size upgrade is the same as the initial buy cost, but you get to hire different types of regiments as a result.

8. Diversify your Men-at-Arms Regiments

Unless you did some extra work in scouting out your enemy’s troops when they fought in other wars, it is difficult to determine which regiments they will be bringing to the fight. The “counter” mechanism can limit your opponent fighting efficiency by up to 90% if it is a direct counter. For example, instead of your Armored Footmen dealing 32 Damage, it’ll only deal around 3 if the opponent brings a unit of Skirmishers to the fight.

Diversifying your regiments gives you a much better chance at negating your opponents and having at least some of your regiments do full damage. This might not always apply depending on cultural troop availability and terrain, but if you are all over the map then this gives you the most flexibility. If you follow tip #7 as well, then you should have no issues with adapting your army to the enemy you are expecting to fight.

9. Bring Mangonels or Onagers if you are sieging

They are cheap compared to other regiments and the decrease in overall time required to siege down a castle is definitely worth it. Instead of the default 1.0 progress per day, you now have 1.6 with Mangonels (1.3 with Onagers). This is a boost of 50% – meaning instead of 3 months to siege down a city, you now have to only wait for 2. If you are fighting any other kingdom or even duchy, the time you save can literally be the difference between victory and defeat.

If you are worried about cost – don’t be! The total for a Mangonel is 0.32/month when raised while a regiment of skirmishers is 0.44/month. For the benefit that it brings for sieges, this should be at least the third regiment you pick up.

The big downside to this is that they have no bonuses to fighting power during regular field battles. The opportunity cost lost here is that you could have afforded another unit of bowmen or skirmishers that might have been handy if it was a close battle. Buying this regiment third would be a good balance between improving your fighting ability and your siege ability.

10. Choose the right Commander

A good commander can influence a battle a ton and even win you fights where your army is objectively weaker. Having a higher tactical score is one thing, but many good commanders also have traits that give bonuses in certain terrain types or to increase damage altogether. Selecting the right commander means you sometimes have to override what the automatic selection is and carefully look through the traits of who you have available.

To change commanders, highlight your army and hit the “Select new Commander” button in the very lower left corner of your screen. Sometimes this button will be greyed out if you are either in battle, or were recently defeated and the army is still retreating. It is usually a good idea to hit that button right when you raise army just to be sure there aren’t any better choices for commanders.

11. Be mindful of River Crossings and Boat Landings

You get a fairly large debuff whenever you are trying to attack someone across a river. It is a much more defensible position and can easily give the weaker army enough of a bonus to win the battle. Taking the long way around might be less time efficient, but it avoids getting you into sticky situations. This is also one of the areas I started paying a lot more attention to than I did in Crusader Kings 2 since I saw many of my armies get wiped by the mechanic.

Likewise, any army that just got off the boat will have a debuff that makes them much less effective. If you are defending against an invading army, stopping them right at the shore is usually one of the best tactics to maximize your winning opportunity.

12. Read through all the Lifestyle Perks

Some of the bonuses from these perks go beyond just being percentage based increases to character ability. For example, the Diplomat Tree has a perk called “Forced Vassalage” that unlocks the “Forced Vassalization” Casus Belli. It is a great way to start wars straightforwardly instead of having to either wait for fabrication or going through the whole process of finding and landing a claimant.

It is also worth reading the tooltips for these new abilities since they can give you a much better idea of what character you could be building into. Using the same example, the “Forced Vassalization” Casus Belli is initially restricted to only being valid on Rulers that have no more than 3 Counties in their realm. However, it can be further improved based on the cultural innovations you pursue. Once you have innovations like “Divine Right” and “Rightful Ownership”, it can increase the vassal realm size by 2 each. Knowing this, you can now tailor your cultural innovations to these specific ones if you are the cultural head.

Reading through the tooltips for all of the perks can be tedious, but it will give you a ton more role-play value and give you greater customization of how you want to play the game.

13. Start with Petty King Murchad in 1066 to explore mechanisms

This is a really common tip but it is one worth repeating. It is considered to be one of the best starting situations for learning since it gives you a really great opportunity to explore the various ways to expand your territory and provides you with advantages over all of your immediate enemies.

You start the game with one County for yourself and one for your vassal while everybody else in Ireland starts with just one. Already this is enough for you to win the De Jure war that you begin with. From there, you can experiment with the “Fabricate” function or learn how to obtain claims through marriage or landing claimants. It is also a situation that forces you to be good with your money since you really have to save up for the men that you want to buy.

Once you have unified Ireland into a Kingdom, you can then experiment with larger-scale intrigue and claiming systems like marrying off your son to one of the lesser noblewomen that still have a claim to England. You will usually encounter issues like rejections due to Patrilineal Marriage concerns which give you a realistic taste of what the rest of the game could be like.

14. Adapt to your character traits

Unlike Crusader King 2, Crusader Kings 3 has a much higher importance placed on traits and how they affect character interactions. Playing every single chractert you use as a Warrior will inevitably lead to your demise. Look at the traits, perks, and stats that your character has and determine which lifestyle would best suit their abilities. From there, read through the possible perks and explore the new mechanisms they unlock. This way you can fully experience the full extent of features the game has to offer.

I initially started with purely going the same strategist/commander character playstyle, but once you being dabbling in other treas like stewardship and diplomacy you begin to realize there are a ton of other options out there. A stewardship focused King can literally generate enough income to max out a stack of men-at-arms and still have some to spare for Mercenaries. Slap on a good commander in your court and you’re set to conquer the world.

My point here is that Crusader Kings 3 opens up a ton of replay and role-play value. Even if you just want to paint the world in the colour of your Empire, there are many different ways for you to do so. I hope that this tip gets you exploring into the diversity that exists in the game.

Conclusion

Crusader Kings 3 definitely lived up to the hype for me and I hope that this list of beginner tips will help you enjoy the game in the same way. There are ton more features in this game and I will do my best to cover them for you. Please comment below if there are any specific questions you have or if you have any other tips that you want included in the guide!

Thank you all for reading and I hope you have a great time conquering 🙂

See our Piety and Prestige Guide here, our Succession and Inheritance Tips here, and our Top 10 Tips for Starting as a Count here.

Please follow me on Twitter and Facebook for consistent updates on my guides and reviews!